Den ultimata guiden till Mailchimp
Så här använder du Mailchimp
Ah ja, MailKimp.
Eller är det KaleLimp?
...MailShrimp? 🤔

Oavsett hur du säger deras namn grundades den Atlanta-baserade marknadsföringsautomatiserings- och e-postmarknadsföringsplattformen Mailchimp 2001 och har sett en otrolig tillväxt genom åren. 🚀
Företaget är känt för sina smarta och udda annonskampanjer, men det är också ett bra verktyg för alla som försöker implementera e-postmarknadsföring i sin verksamhet.
Det är ett enkelt verktyg att använda när man väl har lärt sig hur det fungerar, och dess prisnivåer är idealiska för många olika budgetar.
Men om du är osäker på var du ska börja, oroa dig inte! Vi har sammanställt denna tutorial med steg-för-steg-instruktioner om hur du kommer igång med Mailchimp. 🤘
Åh, och om du letar efter en lättviktig försäljnings-CRM i Mailchimp-stil som du enkelt kan ansluta till Mailchimp: Kolla in Salesflare!
1. Lär dig hur du använder de olika delarna av Mailchimp
Först och främst måste vi förstå de olika verktygen som finns tillgängliga i Mailchimps instrumentpanel!
Som du kan se kommer du till instrumentpanelen när du har skapat ditt konto och loggat in.
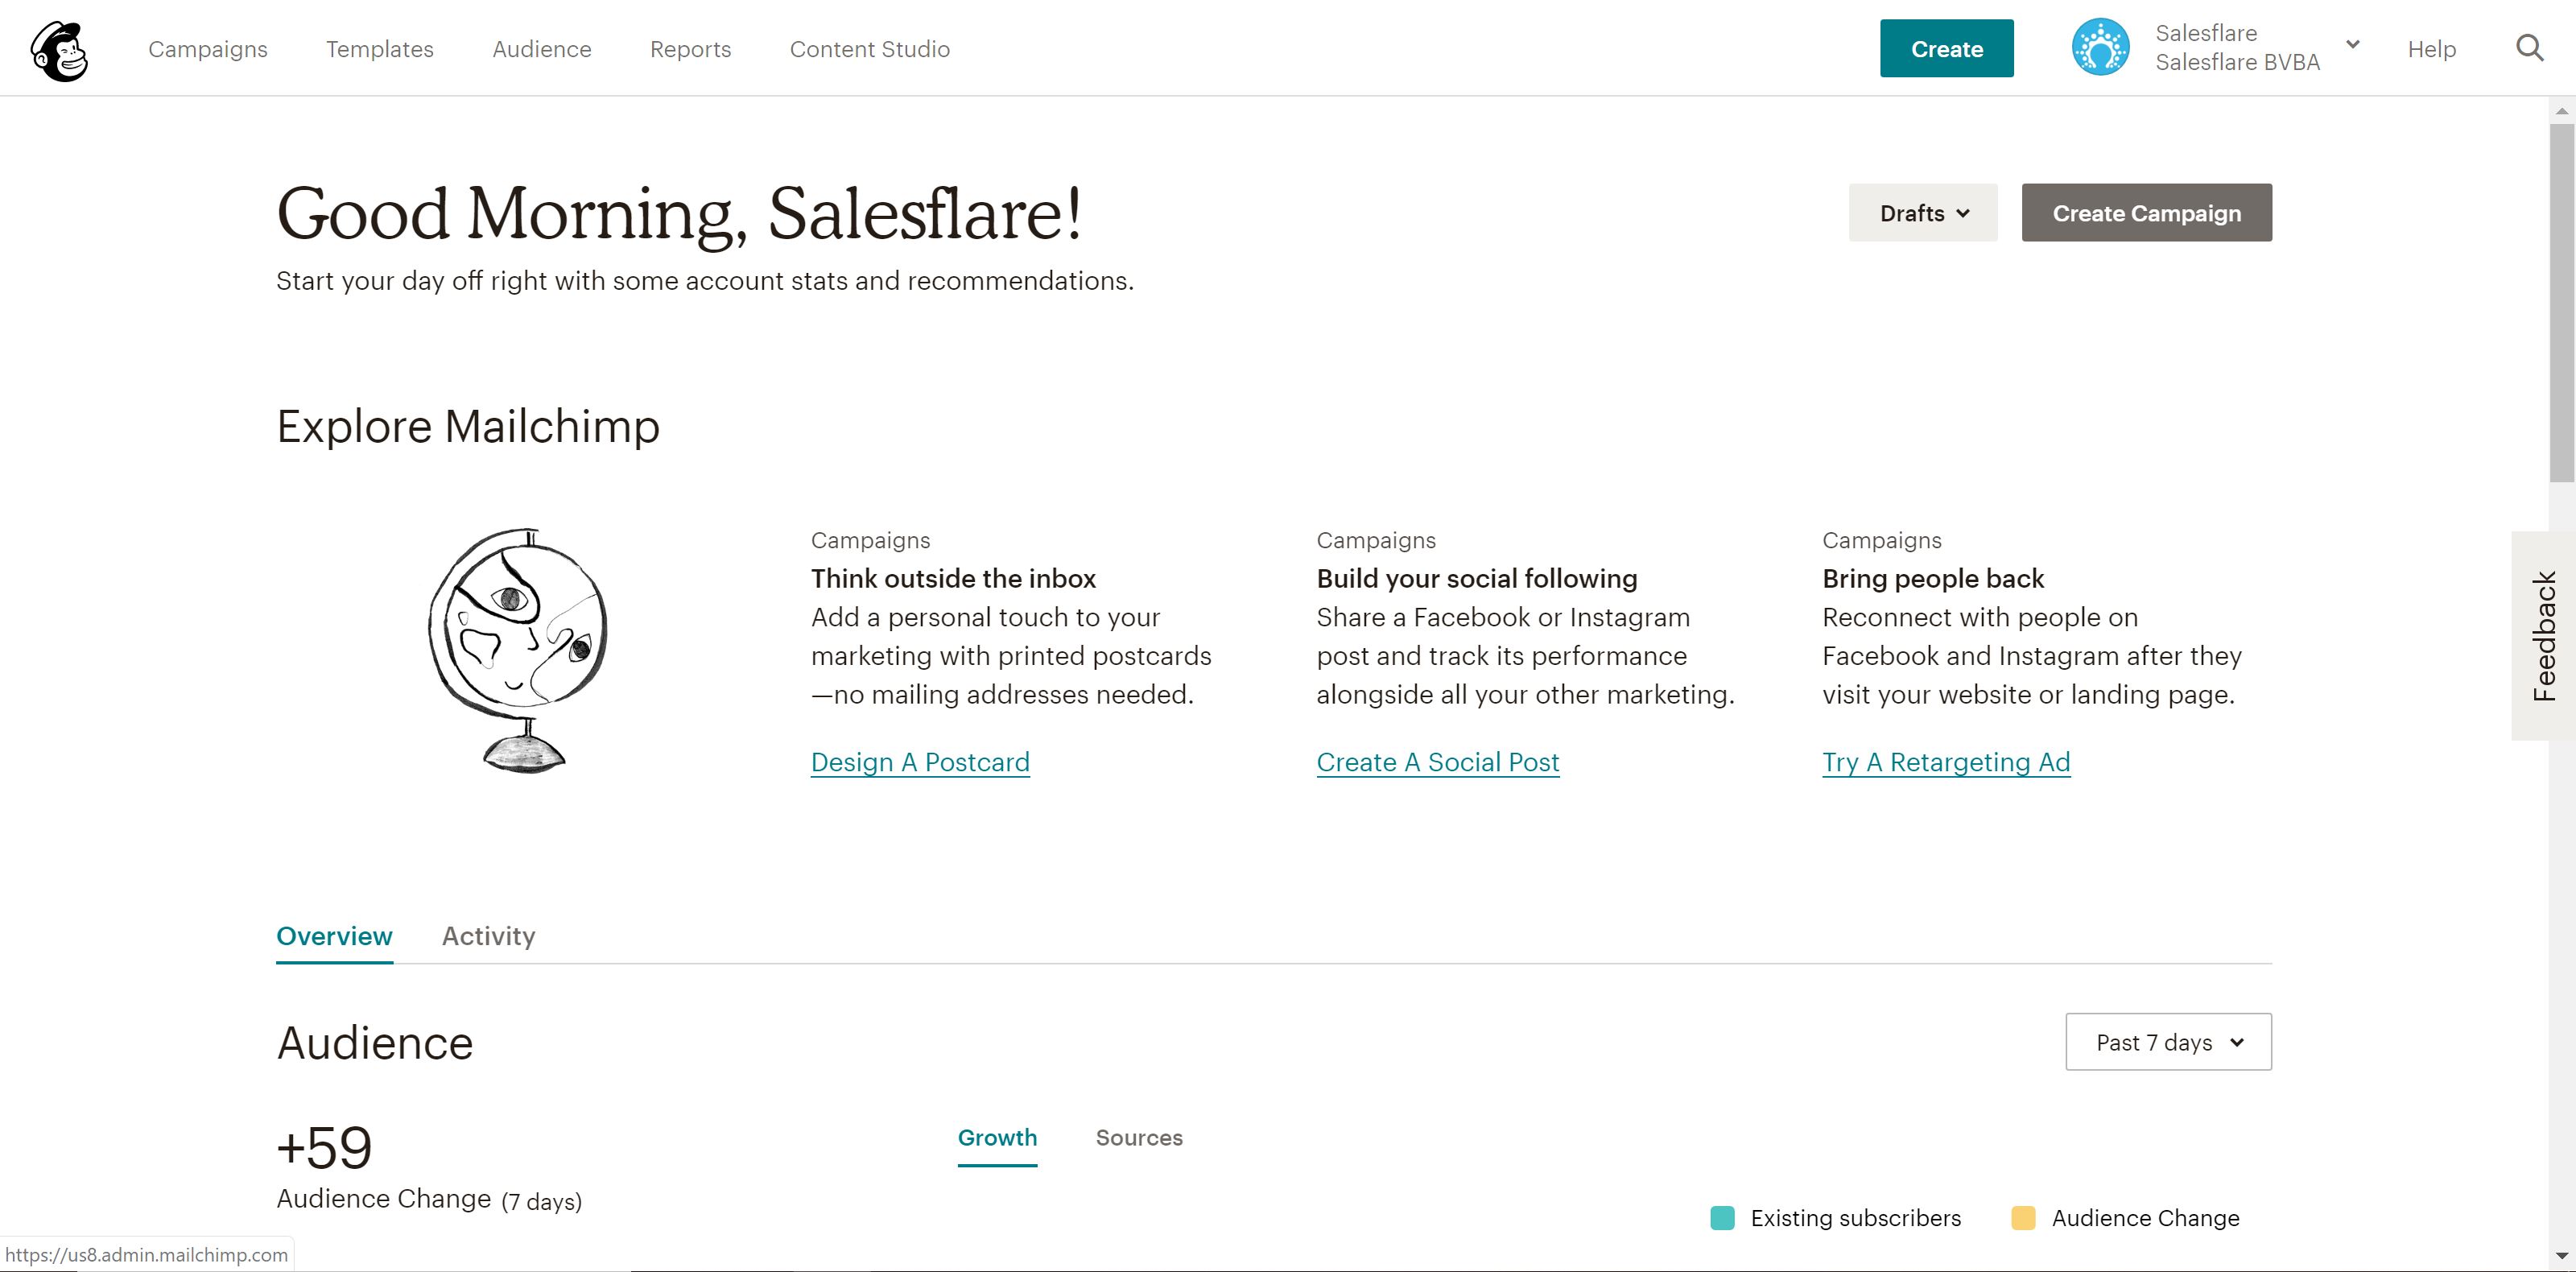
Du kommer att märka att det finns fem olika flikar längst upp till vänster på skärmen: Kampanjer, Mallar, Listor, Rapporter och Content Studio.
Kampanjer är de faktiska e-postmeddelanden, landningssidor etc. som du publicerar och skickar ut till kunder - som en del av din e-postmarknadsföring. Vi kommer att diskutera detta i detalj i steg fyra.
Mallar är det avsnitt där du kan skapa designen och innehåll för dina kampanjer - mer om detta i steg tre.
Publik (tidigare Lists) är avsnittet för, föga förvånande, hantering av dina målgrupper/listor för utskick. Vi kommer att diskutera detta i steg två.
Rapporter - som också är ett ganska självförklarande avsnitt - är där du kan granska dina kampanjers resultat. I princip kan du se vem som engagerar sig i vad och använda den här informationen för att optimera dina kampanjer. Vi kommer att gå in mer i detalj på rapportering i steg 8.
Innehåll Studio är ett ganska nytt avsnitt sedan början av 2019 som ger dig en bättre överblick över dina kreativa tillgångar, som uppladdade bilder, gifs, logotyperosv. Superenkelt, så vi kommer inte att gå in på ytterligare detaljer.
Vi kommer att utforska de fyra första avsnitten, liksom några extra kraftfulla avancerade funktioner, under hela det här inlägget.
Så låt oss komma igång! 👊
2. Bygg dina listor och konfigurera ditt registreringsformulär
Efter att du har registrerat dig kommer Mailchimp att leda dig genom att ställa in allt för ditt konto, till exempel din webbplats, ansluta sociala mediekonton etc.
Du kan till och med ansluta din onlinebutik till Mailchimp, om du arbetar i e-commerce. 🛍
Men efter allt det administrativa är det dags att kavla upp ärmarna och sätta igång med verksamheten!
Det första och förmodligen det viktigaste du bör göra när du ställer in Mailchimp är att bygga dina e-postlistor - rena, uppdaterade listor över de kunder, leads och affärsförbindelser du vill kommunicera med.
Att engagera dina kunder (och potentiella) kunder är trots allt poängen med att skaffa Mailchimp i första hand, eller hur? 😉
Du kan börja med bara en lista, men du får gärna skapa så många listor som du vill - något att notera dock: om du har samma kontakt på flera listor kommer den kontakten att räknas separat mot din totala abonnentgräns, eftersom listorna inte är anslutna.
Du kan naturligtvis segmentera och tagga dina listor - mer om det här.
Det är så Mailchimps prisstruktur fungerar - så gå inte för långt med att lägga till samma kontakt till flera listor. Det kan bli väldigt rörigt väldigt snabbt!
Inga kontakter ännu? Mailchimp har dig täckt. 👍
Det genererar automatiskt ett registreringsformulär för varje lista du bygger - du kan sedan använda detta för att få fler prenumeranter. Dela det på din webbplats, sociala mediekanaler, var du än vill.
Du kan till och med anpassa formulären med hjälp av Form Builder.
Så här gör du:
1. Gå till sidan Målgrupp
2. Välj rätt målgrupp längst upp till vänster, tryck sedan på Manage Audience längst upp till höger och välj Signup forms
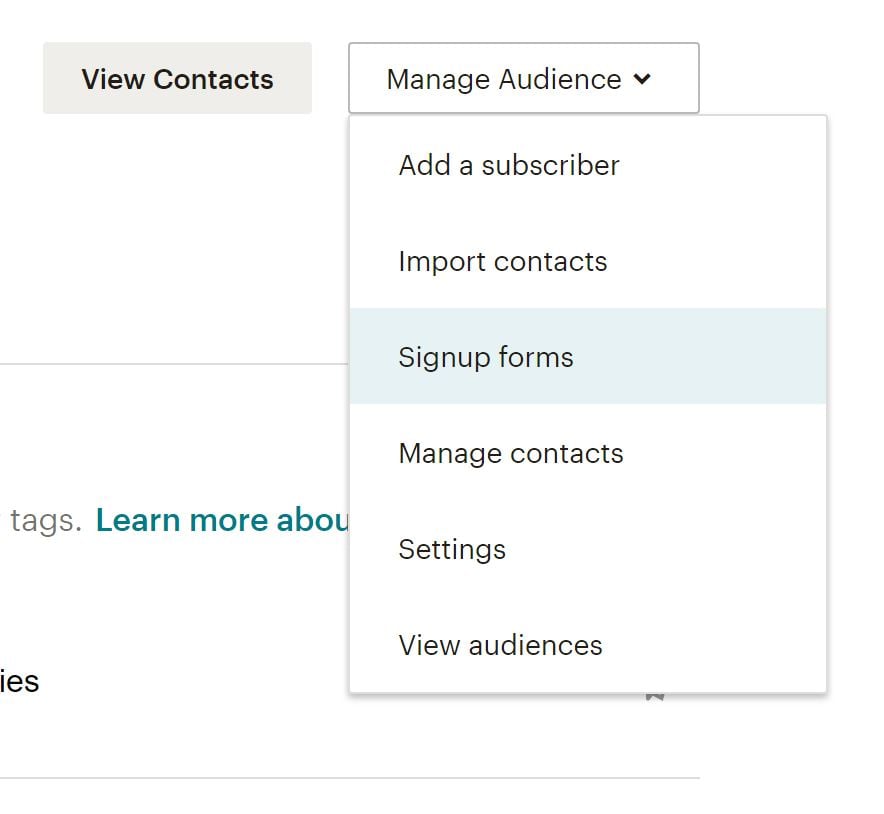 3. Välj formulärbyggare

4. Klicka på rullgardinsmenyn Formulär och svarsmail och välj vilket formulär du vill redigera
5. Klicka på fliken Design it nedan
6. Klicka igenom flikarna Page, Body, Forms eller MonkeyRewards för att granska anpassningsalternativen; använd fälten och rullgardinsmenyerna för att göra de ändringar du vill ha i stilar, färger och fält - Mailchimp sparar dina ändringar automatiskt
När du är nöjd med designen klickar du på Spara och stäng. Nu är allt klart!
Kopiera koden för ditt formulär och dela den i alla dina onlinekanaler. 🎉
Nyhetsbrev eller personliga e-postmeddelanden i stor skala?
Innan vi sätter igång med att lära oss hur man skapar e-postmallar och skickar e-postkampanjer, vill jag snabbt kontrollera om du är på rätt plats.
Är du ute efter att:
- Skicka ett email-nyhetsbrev
- Eller skicka personliga e-postmeddelanden i stor skala?
Om du är här för alternativ 1, läs vidare! Mailchimp är bra, eller så finns det andra nyhetsbrevsprogramvara alternativ för dig. Vi använder Mailchimp för vårt nyhetsbrev också. (Du kan prenumerera på vårt nyhetsbrev på vår bloggs hemsida om du är intresserad!) Fortsätt och hoppa till nästa avsnitt!
Om du är här för alternativ 2, kanske du vill överväga ett annat alternativ.
Fördelen med att använda Mailchimp för detta ändamål är att du kan skicka e-post till tusentals personer samtidigt, snabbt.
Nackdelarna med att använda Mailchimp för detta är att:
- Ditt e-postmeddelande kommer inte att se riktigt personligt ut. Det tränade ögat (och människor är tränade nuförtiden för att upptäcka massmejl) kommer alltid att se att det är ett massmejl.
- Det kommer inte att landa i din publiks prioriterade inkorg. Mailboxar som Gmail och Outlook sorterar numera e-post som skickas med en e-postleverantör i en flik som heter "Kampanjer" eller "Övrigt".
- Detta leder också till lägre öppningsfrekvens (och därmed färre klick och svar).
- Och eftersom Mailchimp måste hantera en hel del missbruk (av en liten men betydande grupp människor), kan detta också leda till att ditt e-postmeddelande är mer sannolikt att fångas i en skräppostmapp.
Så vad finns det för alternativ som inte har alla dessa nackdelar? Du kan skicka dessa e-postmeddelanden direkt från din egen inkorg, på ett personligt sätt och i stor skala. Japp, det finns nyhetsbrevsprogramvara för det också!
Kolla bara in vår guide om hur man skickar massmejl i stor skala som ser personliga ut. Vi förklarar för dig hur du ska gå tillväga steg för steg!
3. Skapa din första e-postmall
När det gäller e-postmarknadsföring kan man höra mycket om design, mallar, kampanjer osv. Men vad är skillnaden mellan mallar och kampanjer?
Som berörts tidigare är Mailchimps mallfunktion i huvudsak där du kan designa återanvändbara layouter för ditt innehåll, medan kampanjer är för att skicka ut de faktiska meddelandena.
Lyckligtvis gör Mailchimp det enkelt för dig att återanvända kampanjdesign eller replikera befintliga kampanjer, men när du använder verktyget är det vanligtvis bäst att lägga återanvändbart innehåll i mallar och meddelandespecifikt innehåll i kampanjer.
Nu ska vi prata om hur man använder mallar! 💪
Som du ser finns det gott om förinställda mallalternativ tillgängliga från Mailchimp. Använd gärna dessa när du lär dig hur du bygger väldesignade mallar.
Men du kan också börja från början och skapa din egen mall för att matcha ditt varumärke och din stil.
Mailchimp sparar till och med bilder som laddas upp på ditt konto, så att du kan återanvända dem i framtida mallar.
Det är relativt enkelt att skapa en snygg e-postmall, eftersom Mailchimp ger dig möjlighet att dra och släppa innehållsblock i ditt nyhetsbrev.

Som du kan se finns det massor av alternativ tillgängliga här. Från förklaringsvideor till bilder och call-to-action-knappar är det enkelt att skapa ett e-postmeddelande med dynamiskt och intressant innehåll.
Mailchimp sparar ditt arbete när du går, och när du är klar kan du spara och avsluta redigeraren.
Tips: Glöm inte att lägga till sammanslagningstaggar! De data du har lagt till i Mailchimp, till exempel logotyper och din företagsadress sparas under sammanslagningstaggar och hjälper dig att lägga till varumärke utan att behöva ange information varje gång. Här är en fantastisk fusktaggar fuskark från Mailchimp för att hjälpa dig att komma igång.
När du har utformat det perfekta e-postmeddelandet eller landningssidan är det dags att skicka ut det till din publik!
4. Skapa din första kampanj i Mailchimp
Kampanjer är där du kommer att skicka ut ditt meddelande till din publik - oavsett om det är en annons, målsida eller e-post - så låt oss dyka in i hur vi kan göra det!
Ett exempel: Låt oss säga att du vill skapa ett nyhetsbrev och skicka ut det till din publik. När du har utvecklat nyhetsbrevet i en mall är det dags att skapa din första kampanj.
Så här skapar du en e-postkampanj:
1. Gå till Kampanjer och klicka på Skapa kampanj
2. Välj E-post, ange ett kampanjnamn och klicka på Börja
3. I avsnittet Till klickar du på Lägg till mottagare och väljer vilken lista du vill skicka e-postmeddelandet till; du kan också välja specifika segment eller taggar i listan om du har segmenterat din publik på ett visst sätt
4. Klicka på Spara och gå vidare till avsnittet Från; ange det namn och den e-postadress som du vill att meddelandet ska komma från och klicka på Spara
5. Klicka sedan på Add Subject i avsnittet Subject och ange ditt ämne och förhandsgranskningstext för e-postmeddelandet - skriv något som gör att ditt e-postmeddelande sticker ut! Klicka på Spara och gå vidare till nästa avsnitt
6. I avsnittet Innehåll klickar du på Design Email och väljer den mall du vill använda för ditt e-postmeddelande; Mailchimp visar dig redigeringssidan igen så att du kan dubbelkolla innehållet och göra eventuella ändringar i sista minuten i designen*
* Om du vill kan du också använda det här steget för att lägga till innehåll och utforma ditt e-postmeddelande i stället för att använda mallfunktionen för att lägga till innehåll tidigare - det är en personlig preferens
7. När ditt innehåll är klart har du möjlighet att ansluta dina Facebook- och Twitter-konton till meddelandet så att Mailchimp automatiskt kan dela din kampanj till dina följare - detta steg är valfritt
8. Slutligen ser du en punktlista längst ner på sidan som sammanfattar de saker du inkluderar och inte inkluderar i ditt e-postmeddelande; var noga med att granska detta för att se till att du spårar allt du vill spåra med e-postmeddelandet
9. Klicka på Skicka och bekräfta eller, om du vill skicka e-postmeddelandet vid ett senare tillfälle, klicka på Schema och välj den tid du vill att e-postmeddelandet ska skickas ut
Grattis till din första e-postkampanj! Du har precis skickat din första e-postkampanj på Mailchimp!

Med Mailchimps olika funktioner kommer du snabbt att upptäcka att det finns många roliga saker du kan göra med ditt innehåll, så ta dig lite tid att leka med verktyget och bli bekväm med allt som finns tillgängligt för dig.
I de kommande stegen kommer vi att utforska några av dessa praktiska funktioner, så låt oss sätta igång.
5. Utnyttja automatisering, spara mer tid
Vi är stora fans av automatisering här på Salesflare, så det är verkligen värt att påpeka de e-postautomatiseringsfunktioner som finns tillgängliga för Mailchimp-användare! 🤓
Från att skicka onboarding-e-post till nya kunder till att skapa ett arbetsflöde för att välkomna nya prenumeranter - det finns många sätt att spara tid för dig och ditt team när det gäller att skicka e-post.
Hur får du tillgång till den här funktionen? Låt oss säga att du vill välkomna nya prenumeranter till din e-postlista:
1. Gå till Kampanjer
2. Skapa en ny kampanj och välj Automatiserad e-post
3. Därifrån kommer du att se att det finns massor av automatiserade arbetsflöden tillgängliga; för tillfället väljer du Välkommen nya prenumeranter
4. Ge kampanjen ett namn och välj den lista som du vill använda för automatiseringen
5. Härifrån kan du designa ditt e-postmeddelande och redigera alla inställningar så att de passar dina önskemål; du kan också lägga till andra e-postmeddelanden i ett arbetsflöde om du till exempel vill skicka onboarding-e-postmeddelanden också. (för att komma hit klickar du på "Använd avancerade inställningar" längst upp till vänster)

6. När allt har konfigurerats klickar du på Next och dubbelkollar alla inställningar innan du klickar på Publish
Boom! Du skickar nu automatiserade e-postmeddelanden till dina nya prenumeranter utan att lyfta ett finger. 💆♀️
6. Experimentera med A/B-testning
Är du osäker på vilket ämne du ska använda för ditt e-postmeddelande? Kanske vill du testa olika copy på call-to-action-knapparna?
Mailchimp förstår att företag vill sätta sin bästa fot (läs: e-post) framåt, så du kan använda A / B-test för att få detta att hända!
A/B-testkampanjer byggs upp i en serie steg, precis som andra kampanjtyper.
Notera: Mailchimp rekommenderar att man testar kombinationer av minst 5 000 mottagare för att få de mest användbara uppgifterna från resultaten. Om du inte har så många prenumeranter ännu, oroa dig inte. Du kan fortfarande ställa in ett test, men var medveten om att data kanske inte är lika exakta.
Följ dessa steg för att skapa en ny A/B-testkampanj:
1. Gå till Kampanjer
2. Klicka på E-post, precis som om du skulle skapa en vanlig e-postkampanj
3. Välj A/B-test
4. Namnge din kampanj och välj den lista du vill skicka e-post till
5. Klicka på Börja
6. Välj den lista eller det segment som du vill skicka din kampanj till
7. Sedan börjar vi välja variabler att testa; välj bland ämnesrad, frånnamn, innehåll och sändningstid

8. Klicka på Plus- eller Minus-ikonerna för att lägga till eller ta bort variationer av variabeln; du kan testa en variabel med upp till tre variationer
9. Varje variation genererar en kampanjkombination som visas i sammanfattningen. Om du t.ex. vill testa tre ämnesrader måste du skapa tre kombinationer av din kampanj

10. Under Hur ska vi dela upp mottagarna? klickar du på och drar skjutreglaget för att ange den procentandel av mottagarna som du vill skicka dina testkombinationer till; granska antalet mottagare som kommer att få varje kombination i Sammanfattning

Obs! Om du testar Send time kan du bara skicka till 100% av mottagarna på din lista.
11. Välj om du vill utse en vinnare baserat på öppningsfrekvens, klickfrekvens, total intäkt eller manuellt; välj sedan hur länge testet ska pågå

12. I slutet av testfasen kommer Mailchimp att skicka den vinnande kombinationen till dina återstående mottagare
13. Ange innehållet i din variation i det angivna fältet; inställningar för variationer för sändningstid visas också i detta steg

14. Markera rutorna bredvid dina önskade inställningar eller spårningsalternativ för att inkludera
15. Testa ämnesrad, från namn eller sändningstid
- 15a. Välj din layout i steget Mall i Content Builder
- 15b.Utforma och testa din kampanj på Design-steget i Content Builder
- 15c. När allt är som du vill, klicka på Bekräfta innan du skickar
16. Testinnehåll
- 16a. Klicka på Lägg till innehåll för en variant av din kampanj
- 16b. Välj din layout i steget Mall i Content Builder
- 16c. På steget Design i Content Builder utformar och testar du din kampanj; när allt är som du vill klickar du på Nästa
- 16d. På steget Beskrivning i Content Builder skriver du in text för att beskriva variationen av innehållet. Dina prenumeranter kommer inte att se den här beskrivningen, men den hjälper dig att komma ihåg skillnaderna mellan varje variation
- 16e. Klicka på Fortsätt till innehåll för att återgå till dina innehållsvariationer
- 16f. Upprepa steg 16a-16e för varje innehållsvariant; i steget Mall använder du en annan mall eller väljer en variant som du redan har utformat på fliken Tidigare varianter
- 16g. När allt är som du vill, klicka på Nästa
17. Bekräfta all information för din kampanj och schemalägg eller skicka den sedan
Kontoanvändare med användarnivå Manager eller högre får ett e-postmeddelande när en vinnare har valts automatiskt, eller efter fyra timmar om du ännu inte har valt en vinnare manuellt.
7. Lås upp Mailchimps fulla potential med integrationer
Det finns många bra integrationer till ditt förfogande med Mailchimp, så se till att ansluta din verktygslåda för att få ut ännu mer av produkten! 🛠
Du kan till exempel ansluta listor till din WordPress-webbplats för fler registreringar eller till och med ansluta ett evenemang på Eventbrite för att automatiskt lägga till deltagare i en e-postlista. Dessutom kommer Mailchimp to Looker Studio integration att hjälpa dig att visualisera dina e-postkampanjresultat och skapa omfattande rapporter för chefer och intressenter.
Och eftersom de har ett API att bygga vidare på finns det praktiskt taget obegränsade möjligheter.
Vår personliga favorit är naturligtvis integrationen Salesflare har med Mailchimp genom Zapier.

Du kan lägga till nya Salesflare-kontakter i en MailChimp-lista eller till och med skapa Salesflare-kontakter, konton och möjligheter från nya MailChimp-prenumeranter. 😄
Du kan komma åt Mailchimps integrationskatalog här.
8. Använd MailChimp-rapporter för att lära dig mer om din kampanjprestanda
Mailchimps rapporteringsfunktion låter dig se hur din publik engagerar sig i ditt innehåll.
Gå bara till Rapporter och välj den kampanj som du vill se en rapport för. Därifrån kan du se allt mer detaljerat och få en bättre uppfattning om hur väl en viss kampanj fungerade.
Det finns en hel del mätvärden du kan titta på, så här är en uppdelning:
- Mottagare: Antal abonnenter som kampanjen skickades till
- Levereras: Datum och tid då kampanjen slutförde sändningen från Mailchimps servrar
- Öppen ränta: Procentandel av framgångsrikt levererade kampanjer som registrerats som öppna
- Klickfrekvens: Procentandel av framgångsrikt levererade kampanjer som registrerade ett klick
- Listgenomsnitt för öppningar och klick: Genomsnittlig procentandel öppningar eller klick på tidigare kampanjer som skickats till den här listan
- Branschgenomsnitt för öppningar och klick: Genomsnittlig procentandel öppningar eller klick för kampanjer i den valda branschuppsättningen för ditt konto
- Öppnad: Antal mottagare som öppnade kampanjen ett valfritt antal gånger
- Klickade: Antal mottagare som klickade på någon spårad länk valfritt antal gånger i denna kampanj
- Studsade: Antal mottagare som registrerat sig som hård eller mjuk studs
- Avregistrerad: Antal prenumeranter som avregistrerade sig från din lista med hjälp av avregistreringslänken i den här kampanjen
- Totalt antal öppningar: Totalt antal gånger som kampanjen öppnades av mottagarna; detta antal inkluderar flera öppningar från enskilda mottagare
- Framgångsrika leveranser: Antalet mottagare som inte hard- eller softbouncade på den här kampanjen
- Klick per unika öppningar: Procentandel av de mottagare som registrerats som öppna som också klickade på en länk i din kampanj
- Totalt antal klick: Totalt antal gånger som länkarna klickades av mottagarna; detta antal inkluderar flera klick från enskilda mottagare
- Vidarebefordrad: Antal gånger kampanjen vidarebefordrades med hjälp av formuläret Vidarebefordra till en vän; denna statistik omfattar endast vidarebefordringar via formuläret Vidarebefordra till en vän och kan inte upptäcka när en prenumerant använder vidarebefordringsfunktionen i sitt e-postprogram
- Öppnar framåt: Antal gånger som kampanjen öppnades av någon som vidarebefordrats kampanjen med hjälp av formuläret Vidarebefordra till en vän
- Rapporter om övergrepp: Antal mottagare som rapporterade ditt e-postmeddelande som skräppost; prenumeranter som rapporterar en kampanj som skräppost avregistreras automatiskt från din lista
- Senast öppnad: Det senaste tillfället då en mottagare öppnade kampanjen
- Senast klickade: Den senaste gången en mottagare klickade på en länk som spårades i kampanjen
- 24 timmars prestanda: En graf som visar abonnenternas aktivitet (öppningar och klick) under de första 24 timmarna efter att kampanjen skickades
- Mest klickade länkar: De webbadresser som det klickades mest på i kampanjen.
- Prenumeranter med flest öppningar: Prenumeranter som öppnade kampanjen flest gånger
- Sociala prestationer: Ger en översiktlig bild av hur bra din kampanj går i olika sociala medier
- Bästa platser: Visar var i världen dina prenumeranter öppnar dina kampanjer
Det finns många mätvärden här, så ta lite tid på dig att gå igenom dem alla och få en bättre uppfattning om vilka mätvärden du vill fokusera på att förbättra över tid. 📈
A/B-testning, som nämndes i steg sex, är perfekt för att testa olika variabler och fastställa den bästa formeln för framgångsrika e-postkampanjer - statistiken för all A/B-testning ingår också i kampanjrapporter.
Där har du det! Använd den här guiden för att komma igång med Mailchimp och skicka engagerande e-postmeddelanden till dina kunder och leads. 👏
Medan den här guiden täcker huvuddelen av funktionerna i Mailchimp, finns det massor av andra saker att utforska och prova själv.
Lyckligtvis erbjuder de en stor kunskapsbas utformad för att svara på alla dina brinnande frågor om en mängd olika funktioner och ämnen - så vad väntar du på?
Trevlig e-post! 💌
Återigen, om du letar efter ett smidigt försäljnings-CRM i Mailchimp-stil som du enkelt kan koppla ihop med Mailchimp: kolla in Salesflare! Vi kommer att ta väl hand om dig.

Vi hoppas att du gillade det här inlägget. Om du gjorde det, sprid ordet!
👉 Du kan följa @salesflare på Twitter, Facebook och LinkedIn.
Senast uppdaterad:
- 22+ bästa podcasts om försäljning som du bör kolla in 2026 - 8 augusti 2024
- Skript för kalla samtal till verkliga människor - 21 september 2023
- De 25+ bästa säljverktygen för att hjälpa ditt team att bli framgångsrikt - 10 augusti 2023